


Creating 'After the jump' summaries
30 Jan 2010 - - 2

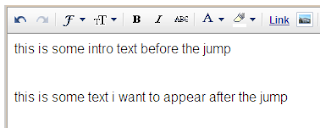
Creating jump breaks in your blog posts can be easily done right from the post editor, without the need for any HTML changes. First, decide where in the post you want to create the jump break, and place your cursor in that position:
Once your mouse cursor is placed at the jump point, simply click the Insert Jump Break toolbar icon:

Clicking the icon will insert a grey bar at the cursor point, illustrating where in the post your break will appear. The bar can be dragged though, so you can always re-position it after insertion.
If you don't use the new post editor, you can still insert a jump break in Edit HTML mode by adding
where you want to position the jump break.

Once you are set on the jump break's location within the post, you are ready to publish your post. After publishing, you will notice that the Read More link is placed where you set the jump break.(blogger support).


Terimakasih, anda telah membaca postingan dengan judul "Creating 'After the jump' summaries", semoga postingan ini bermanfaat untuk anda, budayakan berkomentar setelah membaca ya. 😊


videonya sedikit lama nunggunya, apa karena koneksi internetku ya...? hehe...
BalasHapustutorial yang lumayan membantu untuk pemula, copy paste ya?
BalasHapus